« We've Moved | Main | New PCBs and Yellow Soldermask »
Arduino and Freescale MPX Pressure sensors (April 29, 2008)
Freescale makes a range of integrated pressure sensors with 0-5V analog outputs, in a vast array of configurations. Today, I've picked the MPXV5010DP, but you should be able to adapt this to a range of sensors.
Physical wizardry
This sensor uses a SNSR 8pin Dual Port format, which is like a gull-wing DIP package with two ports poking out. While the gull-wing SMD package is excellent for volume assembly, it's hard to prototype; conveniently, the leads are spaced 0.100" apart, or exactly the same as standard through-hole parts.
By straightening the leads with some pliers, I was able to fit them into a pair of 4 pin female machined-headers (you may find the cheaper folded-leaf/spring variant harder to work with). Using a solder-paste with a lower melting point then the plastic headers, I assembled some legs for my sensor.
Connecting

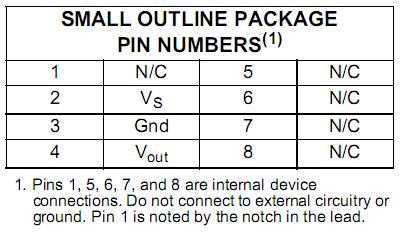
From the datasheet we're blessed with the pin-out on page #1. If you're having trouble orienting yourself, pin #1had a little notch in it, or just follow the picture below.
Here I'm connecting the sensor to my iDuino. Pin 1 is unconnected. Pin 2 connects to +5. Pin 3 connects to Analog #0, Pin 4 connects to Ground. Pins 5,6,7, and 8 are unconnected. Obviously you could do this on a proto-sheild atop a regular Arduino or Freeduino.
Calculating the resolution.
To calculate the real-world value returned by the AtoD converter, we need to know three things: the AtoD reference voltage (a), the AtoD resolution (b), the sensor's output sensitivity (c). Once we know these three things, we can plug them into the formula (below) to calculate the number of pascals/bit.

The AtoD Reference Voltage (a)
In the below code, I'm using the 1.1V reference, but you're free to use either the 5V reference or your own external reference. (If you follow along, a=1.1)
The AtoD Resolution (b)
The Atmega168 has a 10bit AtoD converter, giving us 2^10=1024 possible values. (b=1024)
The Sensor's Output Sensitivity

Again from the datasheet we find the sensor's sensitivity to be 450mV/kPa or 0.450V/kPa. (c=0.45)
Calculating the resolution
Given our 1.1V reference, 1024 unique AtoD values, and 0.450V/kPa resolution, we come up with a formula like this (1.1 volts / 1024) / (450 millivolts/kilopascal) in kilopascal. Working out to about 0.00238715278 kilopascal/value or 2.38715278 pascals/value.
Writing some code
Theory
The basic premise is simple, we sample Analog #0, we multiply by the resolution, and we get a number in pascals. Sadly, there's one final detail, the sensor has some offset voltage, so 0 pascals actually occurs at around 0.6V. To compensate for this, the software stores the offset value and subtracts it from all readings. For longevity, this value is stored and read from EEPROM. (To set the offset, open both sensor ports to free air, wait for the sensor to stabalize, and send a 'c' over the serial port.)
The sketch outputs the number of applied pascals and the sample number.
Code
#include <EEPROM.h>
// Reading from a MPX5010 sensor
// by Kevin Bralten <https://spiffie.org>
int offset=0;
void setup()
{
Serial.begin(9600);
//setup the offset value and print it for reference
offset=EEPROM.read(0);
offset<<=8;
offset|=EEPROM.read(1);
Serial.print("Offset: ");
Serial.println(offset);
//set the aref to internal, you could use the 3.3V regulator too
analogReference(INTERNAL);
// wait while everything stabalizes.
delay(1000);
}
int number = 0; //number of iterations
int x; //fresh value from sensor
float pascals; //after multiplication
/
* based on 10bit AtoD, 1.1V reference, and 450mV/kPa
* we get 1bit = ~2.38715278pascals
*/
void loop()
{
//read the sensor
x=analogRead(0);
//convert to pascals
pascals = (x-offset)2.38715278;
//output the number of pascals and the iteration number
Serial.print(pascals, DEC);
Serial.print(" pascals @");
Serial.println(number,DEC);
//if someone sends a 'c' update the offset value
if(Serial.available() > 0){
if(Serial.read()=='c'){
offset=x;
EEPROM.write(1,offset & 0xFF);
x>>=8;
EEPROM.write(0,x);
}
}
//update the iteration and pause a bit.
number++; // to the next character
delay(100);
}
In use
I happened to have a syringe with just the right size opening for the sensor ports. Here I've connected the syringe to the vacuum port; pulling back the plunger generates a measurable quantity of vacuum. You could also extend the plunger, then connect the syringe to the pressure port; pushing on the plunger would generate a measurable quantity of pressure.
Arduino (6) Atmel (9) Code (7) Freeduino (6) Howto (9) Pressure (1) Sensor (1)
Posted by spiffed at April 29, 2008 12:10 AM